

"There's an unofficial rule that all iMacquarium-dwellers must be named Clarus or Moof!"
After you have tested the tank for leaks and cleaned it thoroughly, there are a few more steps to prep your tank for fish.
The next steps are Choosing Your Decorations, Selecting an Airpump, Choosing the Right Light, Running Tubing and Power Cords, Water Quality, Final Assembly, Creating a Biological Filter and finally Adding Fish.
*Choosing Your Decorations:
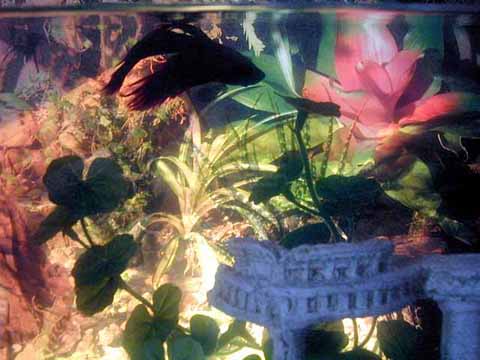
Backdrops create a sense of character and depth. The kind of backdrop that you use should compliment your choice of other decorations. For example, rock-based decorations go with a rocky backdrop and plastic plants look more real in front of a plant-filled backdrop.
 |
 |
Plants add a sense of natural beauty to an aquarium and give your fish a place to hide when it is stressed, but live plants have unique lighting and nutrition requirements and can pollute the water. Plastic plants can look very real and don't require maintenance. Place a small plant in front of a larger one to add a sense of perspective or next to a larger one just to have some variation. Tall plants may need to be propped up by other decorations or secured with suction cups. [TIP-02]
Airstones are hard to position just right and have to be replaced every few months when the pores clog. The practical purpose for an airstone is to break the surface-tension of the water and if you have a filter in your tank then the bubbles from the filter should do that job. If you want some rising bubbles for decoration, a bubble-wand is a good alternative. I like to hide a bubble wand behind another decoration to create the effect of a curtain of bubbles rising from that decoration.
Other decorations like natural rocks and branches, shells and similar items that you find outside and may want to add to the tank can leech dangerous minerals and chemicals into the water. It's better to buy a decorative plastic items from a pet store. Don't add a lot of decorations. Each item that you add to the aquarium displaces an equal volume of water and the more water the tank holds, the more robust the biological filter will be.
Aquarium thermometers are both decorations and indispensable tools. Always keep an aquarium thermometer in your tank -- somewhere easily visible. When you first set up your tank the thermometer will tell you whether the temperature is appropriate for fish. Since room temperatures can vary throughout the year, that thermometer will help you regulate the temperature in the tank, keeping your aquatic friends happy and healthy.
Corner filters will also be visible in your tank. There are two benefits to using a small corner filter in your tank. The carbon in the filter and the friendly bacteria that grow in it will detoxify waste products from the fish and the bubbles that drive the filter will break the surface tension of the water, keeping it oxygenated. The more fish and other critters in your tank, the more filtration you will need. Filters also need to be replaced periodically.[TIP-03] Even with a good filter you should change 20% or more of the tank water at least once a week.
Another kind of filter that you can use is an under-gravel filter, but I don't recommend them in this case because the elevation of the base of the tank will have to be changed to hide it and because in tanks this size such a filter isn't going to help much. [TIP-04]
Gravel is more than just a decoration. It provides lots of surface area for friendly bacteria to grow. The bacteria eat waste products from your fish. The rule of thumb for gravel is to use no more than what you need to cover the bottom of the tank at a depth of 1/4-inch. That's a very thin layer of gravel and amounts to about a 2-pound bag for this tank. Light colors usually look better in an iMacquarium and white gravel makes an excellent choice because it will reflect color from the translucent iMac shell and from your backdrop. You can also add colored rocks and glass beads to the gravel for interesting color variations.
*Selecting an Airpump
Airpumps can be used to power a filter, to animate a tank decoration and to drive air through an airstone or bubble-wand. BUT all airpumps are not created equally. Most airpumps are VERY LOUD and they create annoying vibrations. [TIP-05] Airpumps that have similar ratings may nevertheless push very different volumes of air. You need a more powerful pump if you have more pump-dependent appliances in your tank, but too powerful a pump will splash water out of the tank. If you mount a loud airpump inside your iMacquarium, the noise is going to make your fish miserable (and supposedly can kill aquatic dwarf frogs). You don't need a lot of power for a tank this size, so I suggest that you look for the quietest filter rather than the strongest. [TIP-06]
The best way to pick an airpump is to find a pet store with a good return policy, buy one of each brand, try them at home and return the ones that you don't like. Here's a short list of airpumps that I have tried recently:
| Penn-Plax | Sea Pony | Very Loud | Very Powerful |
| Second Nature | Whisper | Very Quiet | Very Weak |
| Penn-Plax | Air Tech 2K3 | Quiet | Good Power |
| Top Fin | 5-Gal | Loud | Very Powerful |
| Hagen | Elite Mini | Loud Enough to Wake the Neighbors | Very Powerful |
*Choosing the Right Light
Because you built your iMacquarium from scratch, you aren't limited to standard aquarium lamps from a pet store. You could buy a lamp from the local hardware store and adapt it. Just don't buy a halogen lamp unless you like your fish boiled. :-)
Incandescent lights give off a lot of heat and are very useful for temperature-control. Fluorescent lights are cooler, but are usually larger and aren't always as bright as incandescents. You don't need a hot bright light in an iMacquarium (unless you're keeping reptiles in there?). Aim for just enough light to show off your pretty critters while leaving them a bit of shadow to hide in when they are scared. [TIP-07]
The small freshwater critters that you are most likely to have in an iMacquarium are going to appreciate temperatures in the upper 70's (Fahrenheit). The water temperature will be very close to room temperature unless you heat it, so find out what the average temperature is in the room where the iMacquarium will reside. If the room temperature is too cold by more than 10-degrees then a mid-size incandescent (25w or larger) is probably called for as it will heat the water significantly. If the temperature is a little cool then a small incandescent (15w) is probably called for. If the water is close to optimum then a fluorescent shouldn't heat it significantly. If the temperature is too warm then you will have to do some research to find a critter that will thrive in such heat.
If you're not absolutely certain what kind of light to buy then try to get a lighting fixture that can take several different kinds of bulbs. Most of the time that means buying something with a "standard household" or "med" socket. You should have an aquarium thermometer in your tank long before you put any fish in there. Experiment with different bulbs to find which one keeps the water temperature in that perfect range.
*Running Tubing and Power Cords
The thing that you most want to avoid when you run tubing in any aquarium is water making its way into an electrical component. There are two basic ways to avoid that. First, buy an inexpensive check-valve (they usually cost under $2 dollars) and attach it in-line between the airpump and the tank. The second way is to place your components, the wiring and the tubing intelligently. Water seldom flows uphill, so elevate your airpump, your lamp and anything else that could be damaged by exposure to water (you can see the platform for my airpump in the Preparing the Case section). Make your tubing a little longer than you need in order to create drip-loops between the tank and the airpump so that water following the length of tubing will drip down harmlessly onto the inside of the case. Place hooks along the inside of the case to make drip loops for your electrical wires. [TIP-08]
 |
 |
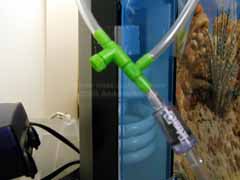
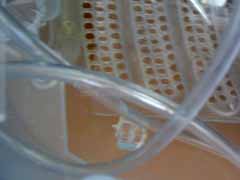
| Here, a check-valve may be seen hanging beneath the green airline connector. The blue plastic in front of the lamp acts as a splash-guard as well as a gel. | Find a spot where you can attach hooks without it showing on the outside of the case. Here, my electrical wires are looped over a hook before exiting the case in order to provide one last chance for water to drip off well away from any electrical connection. A benefit to this arrangement is that it anchors the wires so that moving the iMacquarium won't yank anything out of place. |
 |
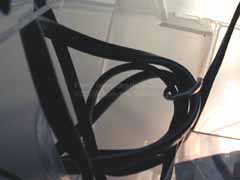
Here is an example of a loops of tubing. Try to have at least 2 loops between the tank and your airpump. |
 |
Tubing can detract from the enjoyment of your iMacquarium if it's very visible. Run it down the back corners whenever possible and use small innocuous suction cups to hold the tubes in place. Use suction cups both above and below the water line to control tension on the tubing. |
Splitters and valves allow you to change the airflow for both aesthetic and utilitarian reasons. I found that the volume of air going to my filter was too high, which resulted in turbulent water. I used a valved splitter to connect a bubble wand and direct most of the airflow to the bubble wand instead of to the filter. [TIP-06]
* Water Quality
There are several ways to make "good water" for your fish.
I use a water filter attached to my kitchen faucet to get rid of chlorine and other harmful chemicals. An alternative is to use a good name-brand bottled water (not distilled water) where they have already removed the chlorine while leaving minerals that help neutralize the pH. Finally, you can use tap water if you add a water conditioner to it -- see your local pet store for further details about water conditioners. [TIP-09]
It's a good idea to buy at least one water test-kit. A simple "dip" kit that checks pH, chlorine, ammonia and nitrite is adequate for a beginning hobbyist although liquid test kits are more accurate. Alternatively, you can bring a sample of your water to an aquarium shop and have them test your water (most do it for free).
After your test run (see below), you are going to fill your tank with water, but that's not where water-considerations end. You should also start a biological filter (see below) and wait for it to develop before you add fish. [TIP-10]
*Final Assembly
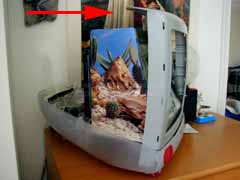 |
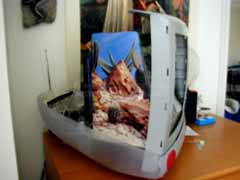
Here's where something that I call "Service Mode" comes into play. If you followed my plans and used a platform similar to mine, you should find that the front-frame can be angled forward to allow full access to the top of the tank. This makes things A LOT easier. |
Once you are certain that everything is working to your satisfaction, empty your iMacquarium tank, clean it with plain water and paper towels and place it on a level surface next to the iMac case. Take your aquarium decorations and rinse them off to remove any dust or odd stuff left over from manufacturing. Rinse your gravel in a collander, turning it several times under running water to make sure that dust and foreign particles have been rinsed out of it.
You are now ready to make your final assembly.
I found that it was easy to put my decorations in the tank first and then move it into the case when it was time to fill it with water. I think that it's less awkward to pour the gravel into the tank when it sits outside of the case. If you don't think that you can lift and maneuver the weight and odd shape of the tank when it is loaded with gravel and partly filled with water, then you can work with it in the case. [TIP-11]
Pour in the gravel to make a layer no more than 1/4-inch above the base of the tank. Fill the tank about 1/5th of the way with good water (see above for how to get good water). Position your decorations. When everything is positioned to your satisfaction, carefully lift the tank (place one hand underneath it for better leverage) and place it inside the iMac shell in its final resting place.
 |
 |
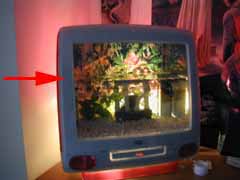
| Slowly add more water to the tank to bring the level up above your decorations. Check the position of your decorations and set your tubing into place with suction cups. The suction cups are more likely to stay in place if you wet them before placing them. Confirm that the water-line is level. You may have to add something to the platform to change the height on one side. [TIP-12] | Continue to slowly fill the tank until the water level is about 3 inches from the top of the tank. The idea is to leave enough space for you to reach into the tank without displacing water over the top. This should be close to your final water level. |
*Creating a Biological Filter
If you already have a healthy aquarium then you start the biological filter going in the iMacquarium by taking some of the water or gravel from your established tank and putting it into your new tank.
Another way to start the biological filter is to buy a product from a pet store. There are two forms of bacteria that you may come across, liquid and powdered. They usually go by trade names like "Stress Zyme," "Bio-Spira" and "Biozyme." Make sure that the stuff that you buy says that it is for freshwater aquariums. Add a teaspoon of either product to your tank now (you can continue to add it every few days until your tank's biological filter has reached equilibrium). [TIP-13]
Now wait a couple of days.
Over the next few days the bacteria will multiply across every surface and throughout the water. You may see the water cloud up -- this is perfectly normal and even desirable. It's time to introduce a fish.
If you don't see the water cloud up within a few days, it doesn't mean that you can't add your fish yet. There's actually a very brief window during which the bacteria can survive without having a fish in the tank to feed them with its waste-products so after 3-4 days just add the fish.
*Adding Fish
There's something called "new tank syndrome" that every new aquarium goes through. The process of creating a bacterial culture before you introduce a fish to the tank is intended to minimize the impact of new tank syndrome. In new tank syndrome, the biological filter (bacteria) is challenged when fish are introduced to a tank. Over several days, the fish's waste products (mostly ammonia) rapidly build up, making the water very poisonous. Bacteria that break down ammonia will multiply and the ammonia levels will drop. Unfortunately, their wasteproducts -- nitrites -- are also poisonous to fish. Next, nitrite-eating bacteria will change nitrites into less toxic nitrates. The bacteria will continue to multiply and compete for nutrition. Eventually they should reach an equilibrium state where there's just the right amount of each kind of bacteria for each kind of waste product. [TIP-14]
The equilibrium is disturbed every time you add another creature to your tank. That's one reason why hobbyists will tell you not to add too many new fish to a tank at once -- the biological filter may not be able to compensate rapidly enough for the increased amount of waste in the water and ammonia or nitrites will then rise quickly to deadly levels. Even if the wastes don't reach toxic levels, the rapidly changing environment can be very stressful and stress can kill the fish.
A Betta is a good "starter fish," which I define as something pretty with a strong chance of surviving in a new tank and which doesn't cost a lot of money. The beautiful male Betta splendens genuinely seem to enjoy living alone in small, shallow tanks and they can survive in a fairly broad range of environments -- although they thrive in water around 78-degrees Fahrenheit.
There are other good starter fish. Zebra Danios and White Cloud minnows are probably the best starter fish for a freshwater aquarium because they can live in filthy water and you can find them 3-for-a-dollar sometimes. [TIP-15]
For the purpose of this narrative, I'm going to assume that you've got a little Betta fish in a plastic bag, fresh from the pet store. [TIP-16]
Make sure that your iMacquarium is open and in "service mode," giving you good access to the tank. Bring your fish over to the sink, open the bag and carefully pour out the water until the level is about 2-inches over the fish's head. [TIP-17] Now carry it to your iMacquarium and dangle the bag in the tank so that it floats with the fish just below the water-line. Leave it for about a half hour. During this time, the fish should be acclimating to the water temperature and visual environment.
After a half-hour, add a few ounces of water from the tank to the bag so that the fish can get used to the water from the tank. Add another few ounces of water a half-hour later. Finally, after another half-hour you can empty the bag into the tank. [TIP-18]
It's normal for a Betta to be curious and poke his nose into every corner of the tank for awhile. It's also normal for him to seek out a hiding place and not come out for hours. Try not to make loud noises or move the tank for the next several hours -- especially do not put the top on the iMacquarium yet because the noise from that is VERY scary to a fish.
There are always tweaks that people make to an iMacquarium even after the fish is in it. Make whatever adjustments you need to make very slowly and over the course of several hours or days if you can. If your Betta learns to associate your presence with scary noises and giant hands invading its territory then it's going to hide whenever it sees you and that's not fun.
Feed your Betta once or twice each day. Use a floating pellet food to monitor his eating habits and because sinking food will rot on the bottom of the tank. Keep his meals at no more than 5 pellets per serving. You can also give your Betta a treat of freeze-dried bloodworms once or twice a week to vary his diet. Try not to feed him too much -- his stomach is roughly the size of his eye, but he won't know when to stop eating.
For a few weeks the water in the tank is going to undergo the dreaded new tank syndrome. The water may get cloudy and clear up several times or it may remain clear throughout the process. Don't change the water filter during this period -- it provides a good surface area for bacteria to grow. You can add more 'Zyme every few days with the hope that it will speed up the cycle.
Leave the top off of the case until the biological filter has been established to ease water changes. You should change 20-30% of the water every day and monitor the ammonia and nitrite levels in the tank. You can also add a product like AmQuel Plus to make it more tolerable for your fish. The trade-off with products like AmQuel is that false ammonia levels may be reported by test kits so you may not be able to tell when the biological filter is established.
When your biological filter has been established, the ammonia and nitrite levels will consistently measure zero. Then you can safely switch to a weekly 20% water change. [TIP-19] Until that equilibrium has been reached, your Betta will be enduring very stressful changes in water conditions and there will probably be extended periods where he mopes on the bottom or floats in a corner or doesn't eat.
If your Betta is sitting on the bottom and not moving, don't tap at the side of the tank to see if he's alive -- just peek at his gills or mouth and you should see a flutter every once in awhile. Some Bettas like to hang out on the bottom or the water temperature may be too cool or he could be stressed from high ammonia or nitrite levels. Test the water. Change some water.
Those first weeks are challenging, but with time, effort and care you can have a happy healthy iMacquarium buddy with a much easier maintenance routine.
If you have any questions, don't forget your greatest resource: a Google search. Good luck!