Preparing the iMac Case for the Tank
Opening the Case and Removing Obstructions
Important: You perform major surgery like this
at your own risk. When you take apart the iMac, you may expose the back of the CRT (the picture tube). When handled inappropriately,
the CRT can send high voltages into your body and kill you. You must safely discharge the CRT before handling it. Instructions for safely discharging a CRT are available
here.
Warning: This isn't an Ikea project. Making an iMacquarium takes hard work, skill, tools, patience and a mature intellect. If none of your friends would call you "handy" and the prospect of working responsibly with power tools, dangerous chemicals and fierce heat scares you then this is
NOT the project for you. Stop now.
On the left side of the screen there is a green sidebar with links to the take-apart guides for both the original and slot-loading iMacs. I'm not going to describe the disassembly, so those guides are your best buddies for this job. Strip everything from the inside of the iMac, including the microphone and gasket from the top of the front bezel. Don't throw it all away -- some parts will be useful in the iMacquarium.
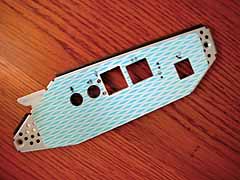
These are the parts that should be modified for the iMacquarium:
 |
The tabs on the bottom of the front bezel should be trimmed to make it easier to remove the bezel in the future. You're not going to screw it into place again, so cut just above the screw-holes, leaving about 1/4-inch protruding to help it stay in place later on. |
 |
The speakers are visible through the speaker grills on the front of the iMac. Keep them and glue them into place against the inside frame. Thick acrylic cement, epoxy and glue gun glue can all do the job. |
 |
 |
With the base of the iMac upside down, make sure that the slide-out bottom-section is in place -- there are tabs that may be tricky to align. Then secure it with one of the big screws left over from the iMac disassembly so that the pieces do not shift. |
Next, flip the base so that it is right-side up and put a few drops of thick acrylic cement along each rail where the two pieces of the base join. The goal is to permanently join the two pieces of the base. |
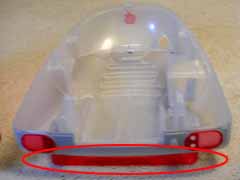 |
This is an optional step: I like the iMacquarium elevated in front, so I cemented the front-foot in the upright position. Use a generous dollop of thick acrylic cement in the joints and it will never move again.
The weight of the iMacquarium will be distributed between the wide front foot and two stubby plastic feet in the middle. It's very stable. |
 |
 |
 |
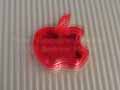
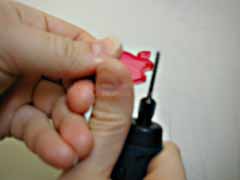
| Here is how to make the hidden feeding hole. First remove the apple logo from the front bezel. It pops out with a little pressure from the top. |
Then, with the bezel and frame assembled in the base, trace the logo onto the inner frame with a marker or grease pencil. (This is what it looks like after you remove the bezel.)
Using the Dremel with the tile-cutting tip, slowly and carefully cut out an apple-shaped hole. Start from the middle of the traced-logo and work your way out. Don't press hard -- let the bit do all the work. |
Once the hole approaches the right size, use shorter strokes to minimize mistakes.
Little mistakes don't matter that much, but a big hole will show through the translucent bezel and look ugly. |
 |
 |
 |
| Holding the Dremel like a carrot-peeler, slowly and carefully trim away just the lip around the apple logo. |
The idea is to get the logo's sides smooth and even. |
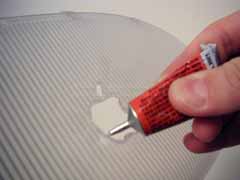
Now take some hobby cement and deposit small drops just inside the lip of the apple-shaped hole in the front bezel. Don't glue the logo back on. When the glue dries, you'll have a hidden shelf. |
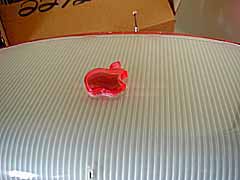 |
This is what the apple logo looks like when you're done. It sits on the hidden shelf and it easily lifts off when you want to feed your fish. [TIP-02] |
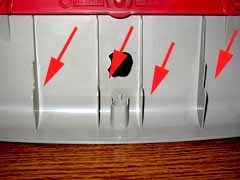 |
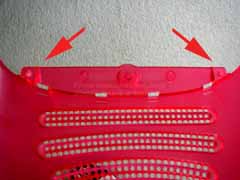
Cut away these fins in the top of the front-frame. The round microphone-mount in the center does not need to be cut off. |
 |
Cut away the pins at each corner of the front frame and all of the bits sticking out of the frame around the hole for the CD. |
 |
Cut off these protrusions from the top of the case. Tin snips or a Dremel cutting disc make quick work of them. |
 |
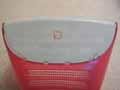
Using a glue gun or quick-set epoxy, mount the faceplate that sat over the USB, Ethernet and modem ports to the inside of the case sitting flush and level against the hole in the side where it resided originally. You can black-out the holes by gluing black paper aginst the inside of the plate. [TIP-03] |
 |
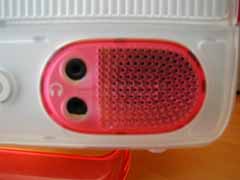 |
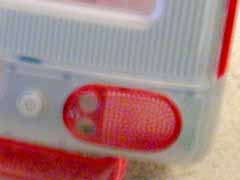
| There's a little circuit board with the power-button and the front earphone jacks that should be mounted on the inside-frame for purely aesthetic reasons. Position it while the front bezel is attached to the frame so that you know how the holes align. Glue it in place. |
It looks a lot better with the earphone jacks filling those holes. |
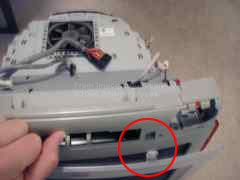
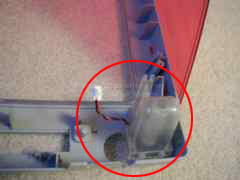
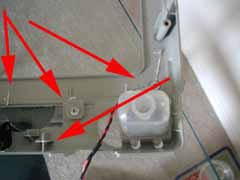
With so much space inside the iMac case, so why not mount your aquarium airpump inside where it won't mess with the aesthetics of the iMacquarium? Just remember to elevate it a bit as an aid to keeping water out of the motor. I made a simple stand to secure my airpump using 1/8-inch plastic with acrylic cement. It is attached to the frame with more acrylic cement. You don't need to build a stand, but here's what mine looks like:
There's a shelf sitting on a piece of shaped plastic that forms a three-sided base. [TIP-04] Above the shelf are two side pieces that hold the airpump in place. [TIP-05]
|
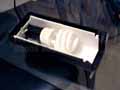
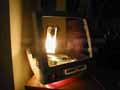
A lamp is an optional item for your iMacquarium. I purchased a 15w aquarium hood kit designed for a 2-1/2 gallon glass aquarium, trimmed the frame, swapped the incandescent bulb for a white fluorescent and stood it behind the tank. Lamps can be used for illumination or heating or both and your choice of lamp, bulb and mounting position should vary depending on what creature is meant to reside in your iMacquarium and where you keep it. [TIP-06] |
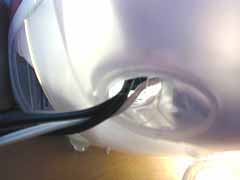 |
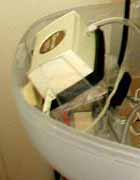
This is the back of the iMacquarium. To make space for the power cords running out the back of your iMacquarium, use your Dremel to carve away the inner-lip of the hole. You're going to need a lot of room to get the ends of power cords through. |
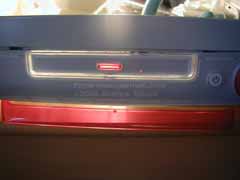 |
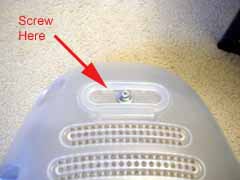
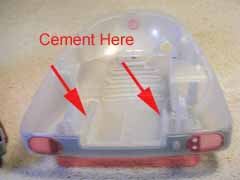
Save the front of the CD ROM tray until the very end of your build. It's only got a thin shelf to secure it from the bottom and you're likely to break it off if you glue it before the tank is in the case. When you're ready, lay a bead of thick acrylic cement along its bottom then press it in place (centered in the gap) for about a minute until the cement sets.
|